I enjoy working with the STM32 processors. They are easy to use, powerful and cheap and there are lots of options for developing code. One minor annoyance is the question of a programmer.
ST-LINK/V2
One of the most commonly available and widely supported commercial programmers is the ST-LINK/V2. This is a handy little device that can do a lot of jobs. It is not too expensive (about £22 from Farnell). I didn’t really need all that functionality and, while not very big, it was clumsy to carry about.
I had previously determined that I needed only four wires from this to my target board. They supply SWDIO, SWDCK, GND and VCC for use with SWD programming and debugging. I have more details in this previous post. The VCC line seems only to be needed to power level converters in the ST-LINK/V2. That meant that I could get away with just three wires going to my target board so long as I was confident that the programmer and target voltages were the same.
Elsewhere, [see Taylor Killian’s site] there is information on how to extract the ST-LINK/V2 firmware from the upgrade package and program your own device. With that in mind, I decided to build my own SWD-only programmer based on the ST-LINK/V2. But I didn’t want to faff about extracting firmware and programming up bare devices or putting ST code to dodgy use.
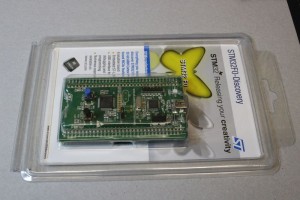
STM32F0Discovery
Then it occurred to me that there is a ST-LINK/V2 on all the recent crop of ST Discovery boards. They are cheap and the processor on them is already full of the right code. The cheapest of them seemed to be the STM32F0Discovery – available at Farnell for about £8. And it comes with a handy prototyping board.
A blank chip from the same source would be £4. It would be easy to extract the processor from ST-LINK portion of the discovery board. After that I would still have a full discovery board and a spare prototyping board. Hard to see a downside really.
DIY board
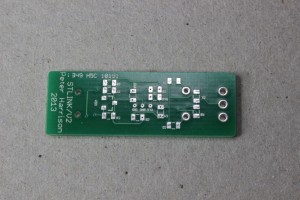
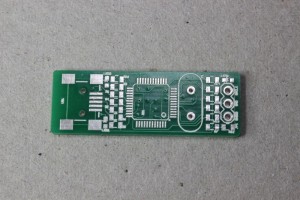
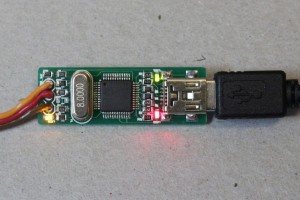
It didn’t take long to extract the relevant circuit details from the discovery documents and turn that into a small PCB. I wanted something as small as I could manage but still reasonably easy to build. It must replicate the functionality of the original ST-LINK/V2, take power from the USB connection and provide the three programming connections that I needed. There would be no extra bells and whistles – just a simple SWD programmer/debugger. I sent the board files off to Seeed Studios and waited – impatiently – over Christmas for the boards to arrive.
I left the silkscreen too small but that is OK. Once assembled I don’t much care what it says. It is easily populated with 0805 size components. The connector and the processor are taken straight off the discovery board as is the crystal. I know the crystal is enormous but I quite like the look of it there.
Good to go
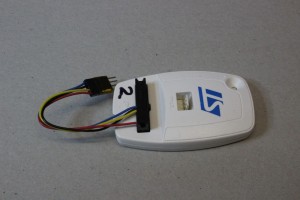
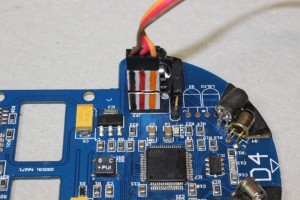
Once assembled, it powered up just fine and the ST-LINK utility checked it out and updated the firmware for me without any fuss. I used a simple servo connection lead to connect it to my target board and verified operation. No fuss – it just works. Since I am forgetful, I labelled the connector to be sure I get it the right way round. Nor harm will befall it if reversed though.
I have a few more boards so I need to make a couple of spares. On the others, I will use a right-angle pin header for the output and cover the whole thing in a length of clear heat-shrink to protect it. Not a bad day’s work I would say.
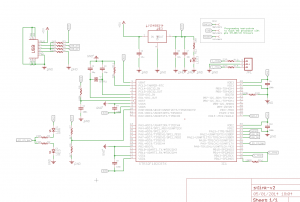
Here is a copy of the schematic:
Very nice! How did you unsolder the processor?
Hot air gun. Took no time at all. I used a ‘proper’ one but Some hobby stored sell a cheap hot air gun that gets hot enough. I think. Even a paint-stripper would do with care.
Very interesting Peter. I also have that 32F0 Discovery board lying at home, do you have a pair of pcbs to sell me?
Thats a useful technique. Will any hot air gun do it, or do I need to acquire one in particular that reaches a certain temperature?
Also how do you recommend we get our soldering skills up so that we can hand solder processors like you have done quite nicely?
Your hot air gun would need to get up to about 250 degrees C and you need to take great care to avoid damaging the components, the board or the surface upon which it is all sitting. I have a ‘proper’ hot air rework tool but I have used a paint stripper before. These are pretty brutal though.
As for soldering it back on – that is actually easier if you take care. I would suggest a trawl around YuTube for videos that look like you could manage the same. I do not have any favourites bookmarked.
If these are not techniques that you are already happy with, you need to get some practice. The easiest way is to find some old broken equipment – USB hubs or flash disks for example – and try removing and replacing the components.
If solder is an issue for you, there are tons of cheap mini version of ST-Link V2 on Ebay sold under $10 USD, works same as the official one.
it is possible to get this FW as HEX ? t.o.m.a.s.z.1.9.8.7.@.g.m.a.i.l.c.o.m.
Not that I know of. If you follow the links through from Taylor Killian’s site [http://www.taylorkillian.com/2013/01/retrieving-st-linkv2-firmware-from.html]
you may find out how to do that.
I am experimenting programming my STM32F4DISCOVERY with an off-board ST-Link V2 via SWD. It will only work with the two jumpers (CN3) that connect the on-board st-link and the stm32 present. (I am not connecting the inbuilt st-link to the PC (USB)). I would have imagined the off board programmer would work with the on board programmers jumpers disconnected. That doesn’t seem to be the case.
Any Info on this would be helpful!
Many Thanks
I have had no trouble doing exactly that. If I understand you correctly.
I can connect an external programmer via SWD directly to the PA13/PA14 pins on the discovery and program away merrily.
The stand-alone STLINK/V2 does need the 3V connection though – so that is four wires in total. I think it uses that to power level convertors or. My adaptation does without that only because I know that the target board has an appropriate voltage.
Hello and thanks again Peter. I went to mount the board last weekend but realized that I do not have the voltage regulator (I assumed it was in the discovery board, my fault), so I have to order it and wait it arrives.
In the meantime I have subscribed to this interesting course, starts today night:
https://www.edx.org/course/utaustinx/utaustinx-ut-6-01x-embedded-systems-1172
I also had that Stellaris board lying at home, so this is a great oportunity to start learning on Cortex M4 microcontrollers.
Ah – yes – the voltage regulator. I should have warned you. Sorry, I just used what was on hand. Interesting-looking course.
There are new STM-Nucleo board series with a detachable ST-LINK/V2. The Nucleo boards are very cheap at about $10.33 USD at mouser .com.
that’s very interesting! I think I will buy that F401 version. Customized programmer is more fun to use though.
Hello, I am very interested in doing a mini developer of this type, I have two questions, this can be done with programming and debugging of code, and if so could you share the card designs to make your own. Thanks for the input from your blog, they have served me a lot!!
I will try and get the board files up in the next few days. Feel free to remind me if I forget.
I have a question regarding powering the target board. I understand the the Mini-STLINK gets power from USB. How is the target powered? Do I just power it up with the regular USB cable like normal? Do I need to worry about resetting the board before programming? How does this work?
Sorry for the delay.
Fo my small board, the target has its own power. As far as I know the power line on the programmer cable from the actual STLINK/V2 is used only to power voltage translators in the programmer. I have no need of hose and know for certain that the target has a 3V3 supply. Or none of course but the programmer soon finds out there is nothing there.
You could power a target from the programmer of the current requirement were small. I figured that the target power requirements were not predictable enough to make it worth adding to the board. The main requirement was small size.
Hi ! Nice work and thank you for sharing.
I am starting with stm32 and have a few questions : the swdio/swdck pins are used to flasht he target processor. What is the use of the to SPI pins connected to JP1 then ?
Thanks a lot
Thank you.
Which JP1 connector do you mean exactly?
On your schematic, a JP1 block is connected to T_JTMS and T_JTCK signal. Are those signals used to programm the target stm32 ?
Thank you
I see. Yes, those are the two pins used for the SWD connection for programming the target. They are just alternative names used to refer to the full JTAG connection. I should probably have labelled them SWDIO and SWDCK. Sorry for any confusion.
Hi! There were / are some better firmwares than st-link (incompatible with st-util though) You could use:
1. CMSIS DAP Compatible FOSS port for STM32F103C8, STM32F102C8 (PCBv2), STM32F103CBT6(PCBv1) here: https://github.com/x893/CMSIS-DAP
Why CMSIS DAP is better: Open standard, OpenOCD support, allows low-level commands st-link is HLA, Keil support, NFO here: http://developer.mbed.org/handbook/CMSIS-DAP
2. Versaloon port for st-link CPU. Why better: Open source, allows low-level commands.
NFO: http://hackaday.com/2011/02/06/versaloon-ported-to-stm8-and-stm32-discovery-boards/
http://takenapart.com/?p=82
Hi,
i am working in electronics company, during testing time Main PCB is shorted so AC supply come to ST-LINK/V2 programmer, & i seen stm32 f103c8t6 IC is blown, now if i placed stm32 f103c8t6 IC will it work, please help…….:)
no, it won’t work, because the new IC doesn’t have firmware in it.
is there anyway replace IC by new one from vendor or shop, & i read firmware (upgrade) is available online so if i update these will it work………thanks in advance…:)
this won’t work either. firmware is upgradable if and only if there is firmware existing in IC in order to communicate with computer through TMS and TCK pin.
You choice will be buy a st link V2 and take off the IC and put it on your damaged PCB or make your own mini st-link V2, program it with programmer by downloading the firmware file to new IC with another programmer. Unless you have programming ports reserved on your PCB(so you can solder new IC and use another programmer to download firmware to it), otherwise there is no easy way to make this happen.
Hi,
it’s no need to strip off the programmed STM32 from discovery. Here are the binaries:
How to program blank STM32F1 with STLINK V2 firmware
http://e.pavlin.si/2016/02/28/how-to-program-blank-stm32f1-with-stlink-v2-firmware/
Hope this helps.
Marko
Thank you
Thank you SO much for that bin, Marko. That’s very helpful.
To Peter:
I left a comment above, which you replied to, about powering the target from the programmer. Since the programmer won’t know the target power requirements, and therefore won’t provide power, is there a certain power-up procedure when programming the target? Or can you just apply the power, then plug in the programmer and start programming at any time after power on? The on-board ST-LINK seems to be able to program the board at any time while powered up. Can this programmer do the same?
I have my target powered separately. The programmer has no trouble putting the device into programming mode. I think the power pin on the SWD is just for level conversion anyway.
Hello Peter
Nice write up. Well done!
I want to debug STM32L151C6U6 (QFN 48 PIN) but unfortunately there is no development/discovery available to use for debugging. Using this: http://www.waveshare.com/qfn48-to-dip48.htm can I make a super mini-development board just for debugging purpose?
It would be a lot cheaper to design some boards yourself. Make them fit on a breadboard if you like. They could even be designed to have the programmer on board or the board could be used directly in your product when you are ready.
Peter, I note a 100R (R16) from pin 25 to 27 in your schematic. That does not appear to be on a 32VL Disovery board, do you know why it is there? Owen.
I’m sorry, I don’t. I just copied the schematic I had from the discovery board. I would guess that since the STLINK can to SWD and JTAG, and it is sharing the TMS and SWDIO function on the same connector pin, and this resistor limits current if the pins are placed in opposing states. Just a guess though.
Thanks. I have installed STLINKV2 on my VL Discovery, but it will not produce SWD output. The only circuit difference I can find is that resistor is not on the Discovery, so I will tack one on and see if it sorts itout… Owen
Interesting. Let us know if it works.
my question is, in programmer board the micro controller connected directly to USB port, can we get rid of the programmer board and connect the target board to USB directly and burn my code through this way ???
Take one board, desolder chip and solder on another board?? That’s not a solution at all, it’s scratching left ear with right hand. I don’t know what a rubbish is inside “st-link”, but it definitely doesn’t worth money we spend on it. Smart Atmel guys produce board together with CH340G converter, so no any “programmer” is needed at all!
BTW st-link sold for $2 on Ali.
ST-Link is HLA. e.t.high-level adaptor. This means that some low-level commands do not work with them, for example you can not unlock the flash of Kinetis KL-26 series ARM M0 chips with such.
I did a PCB with the same schematic as yours but when I connect the STLINK to the computer the LED flashes continuously and I get a comunication error (No STLINK connected). Do you know whats happening?
Not really. Sorry.
Mine just worked. I assume you took a pre-programmed ST-LINK chip and transplanted it? Have you tried the stand-alone ST tools? How about a different USB port/hub or even restarting the PC?
In these day’s it seems like too much to be worth.
I bought myself some ST-Link V2 (clones ?) from Aliexpress and I can confirm that they work (At least for programming)
On Ali / Ebay / China these things cost about EUR 2, and they have a nice pretty sturdy aluminimum housing.
You are quite right. I use the STLink clones as well.
There is a place for making your own though. On a custom board or project, you could add an STLink. Also, I have a need for a single device that combined serial, battery charging and a debug/programming interface. For that, I will use this technique.
Has anyone thought about combining a bluetooth module to the front of this so we can upload via bluetooth to the stlink to the stm32.
I am highly interested in doing this. Is at all possible?
So in essence you could upload the CMSIS DAP firmware to this like you did to an ST-link.. correct?