Pretty well everything is ready now to put together Decimus 4 – my latest micromouse. The last part to be done was the wheels. While I had the materials and the tools to make these, I certainly didn’t have the time so I thought I might as well try having them printed, like the motor mounts, by Shapeways.
My experience with the motor mounts was less than totally successful but I understand a little more about the materials and the likely accuracy now so a wheel design was sent off for manufacture.
The design errors so far with Decimus 4 placed some fairly serious constraints on the wheels. I could not make them as big as I wanted so ground clearance was always going to be marginal. the tyres that I thought I had turned out to be a figment of my imagination and I ended up choosing the Kyosho MZW2-20. There will add about 5mm to the overall diameter but they are nice and grippy. There are thinner tyres but I couldn’t find a supplier with the number I needed. That left me with wheels with a 17mm diameter and so the tyres may well need gluing on to be sure they don’t get shed when the mouse it running.
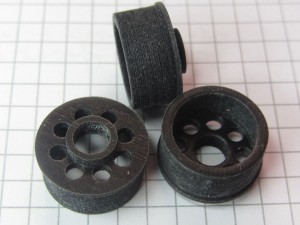
Shapeways managed to deliver in about a week and first impressions were encouraging:
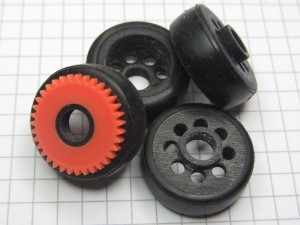
The wheels measured up at exactly the dimensions I set and everything fitted together very well. The hubs are not really big enough because the material is a little more flexible than I would like and so the bearings could do with a little more support. The next design will be an improvement now that I am happy with the accuracy and will allow for normal bearings sitting in a pocket rather than the flanged bearings that I used.
The drive gears are 35 tooth, 0.5 mod Scalextrix gears that are a push fit over the boss on the rear of the wheel. The gears come in packs of five with one each of 34, 35, 36, 37 and 38 teeth. There are matching pinions with 8, 9, 10, 11 and 12 teeth which makes it easy to change ratio without changing the centre-to-centre distance.
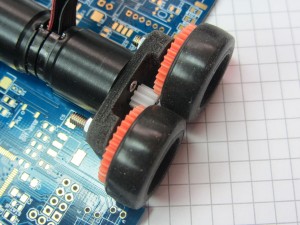
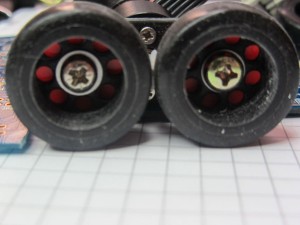
Once mounted on the mouse, it is apparent how little clearance is available between the wheels. It should be possible to increase the diameter by nearly 1mm which will help with the ground clearance which is only around 1.2mm. Fine on a good maze but possibly marginal on some.
Because the motor mounts are not really rigid enough, some extra work will be needed before it is all ready. A 1mm spacer placed between the rear faces of the motors will counteract the slight camber that the wheels have and help a little with the ground clearance. Also, solid axles between the mounts will keep the wheels the proper distance apart and counteract the slightly uneven toe-in. While I have always thought a little toe-in to be a good thing, I would rather it was by design. This will also hold the wheels a little further apart to allow a slightly larger diameter.
Otherwise, the setup seems very free running and, remarkably, all four wheels touch the floor together so that is one worry eliminated.
It is far too late to get this working for the UK contest at Birmingham Techfest on June 16th but I do hope to have it running in Taiwan later this year.


hey Peter, everything looks great! But aren’t the gears bound to move if they are just press fitted to the rim?
I only tried it out this evening but they seem pretty solid just now. I have subjected them to some large overload without any movement.
Also, the gears go on first, followed by the bearing which expands the boss a little to tighten it up.
Even so, when I am happy with everything, it will be glued. All the forces are in shear so a simple application of superglue shomld be more than enough.
Look forward to seeing it running!
How do you make the hole on the gear?I am asking this because i have to enlarge the hole on the gear but i’m having problem making it centered.
The Scalextrix gears come with an 8mm hole already so the wheels were designed around that.
There are cone cutters available for enlarging holes.
If you have a drill press, you could this (no guarantee it will work). Put a centre drill or other conical point into the drill chuck.
Lower the quill so that the point holds the gear in place on a suitable piece of packing material that won’t move.
Clamp down the gear and release the drill.
Put the proper size drill bit into the chuck and drill the gear.
If you try this, do so on some scrap first. It will take practice and may not even be possible if you don’t have a suitable drill press.
Great work Pete,
Are these standard Scalextrix spurs/pinions?
Regards,
Dave
They are. Well, the spurs are. The pinions I don’t remember.
Spurs from pack part number C8405
Hi Pete,
How much clearance do you have between your tyres, looks tight? If you were to design your mouse again would you increase of decrement the clearance?
Cheers,
Dave
Interesting question. Yhe distance between axles is, of course, determined partly by the available gears. For the same gear pitch, I would have to reduce the gear ratio to get a bigger spacing. That would compromise the mouse acceleration but I could use smaller tyres and, having the wheels further apart would improve the ability of the mouse to accelerate without tipping. Set against that – the further apart the tyres are, the greater the losses when turning due to the tyres having to scrub.
the short answer is – I don’t know. On this mouse everything was dictated by available parts. I think a couple of millimeters more might be helpful.
I didn’t notice that you don’t need to expand hole for gear since it came this way. If it has 40t version I’ll definitely go for it. I am using 2×5 mm ballbearing and the quality is just awful, since mini-z doesn’t have 2x5mm version. I wish there is 40T M0.5 Scalextrix gear so I can just print a wheel to use 2x6mm mini-z ball bearing because its quality is excellent! I really don’t want to expand gear’s bore hole by myself.
Hi Peter,
How did you put pinion on 1717 Faulhaber motor ? Did you press-fit the pinion ?
I thinks this is not a good idea, but I don’t know how to do with Scalextrix pinon !
Yes, it was a press fit. They don’t have to be super tight on the shaft to work well.
Thank you very much for your reply! However, Faulhaber does not recommend doing press fit on its brushless motor. I’m afraid of damaging my motors… What tool did you use to do the press-fit?
I was lucky in that the nylon pinions I used were good fit without excessive force and they simply pushed on with only finger pressure. You could use reamers to get a better fit. Or you could use brass pinions with a sliding fit and loctite.